How to use the Remote Link feature
“Link” feature allows you to map app data as a PC directory, so that you can use PC softwafre to edit and manage your data.
This feature is based on general WebDav protocol. Most operation systems should support it out of the box, but maybe it is not that easy to use. So here is some easier way to go.
Windows
On Windows platform we recommand you the third-party software, RaiDrive. You can download it by clicking the link below:
RaiDrive 1.8.0 https://raidrive.en.uptodown.com/windows/download/2114805
(1.8.0 version is not the latest, but it has everything we need, and more importantly, it have no ads)
Install and open it, you may see panel like this, just follow the tips:
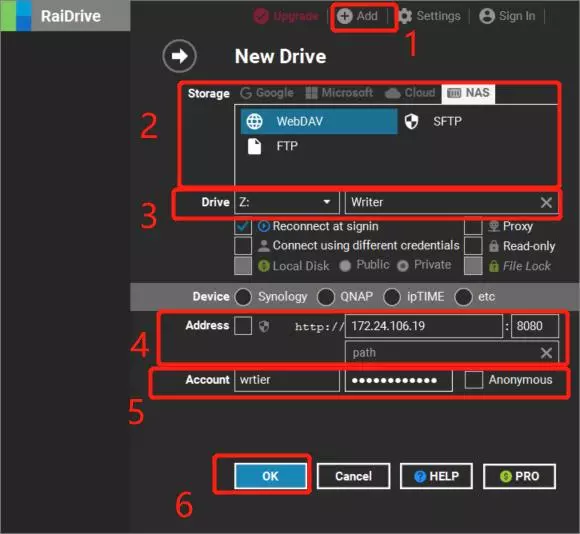
- Click “Add” button on the top to enter the configuration.
- Go “NAS” tab and select the WebDav option
- Input the dirver name as you like
- Input the address
- besides the text “address” you may see the checkbox, just keep it UNCHECKED so that we can use http url.
- Input the IP address and port number, which you can find when you turn on the link feature in the app.
- Input your customized user name and password if you have any, otherwise just check the “Aonymous” checkbox
- Click “OK” button to start mapping
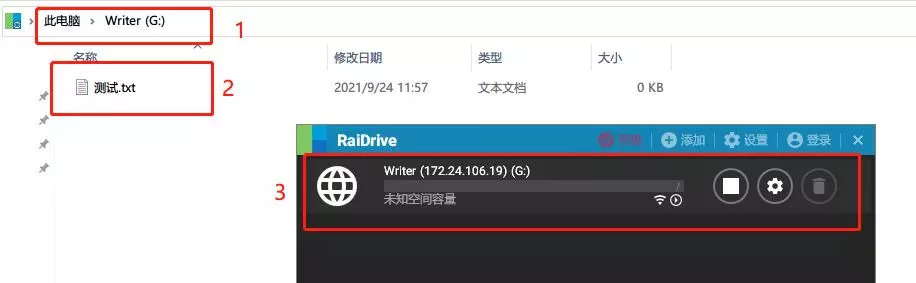
If everything goes well, you might see this:
Linux or MacOS
MacOS
On macOS, you can use the built-in Finder to connect to the WebDav service:
- Open Finder.
- In the menu bar, click Go and choose Connect to Server… (or press
Command + K). - Enter the address shown in the app into the address field, for example
http://192.168.1.100:8080. - Click Connect.
- If prompted, enter your user name and password, or connect as a guest.
- Once connected, the WebDav service will appear in Finder as a network drive, and you can access and manage your data like a local folder.
Linux
On Linux (taking Ubuntu desktop as an example), you can use the built-in file manager to connect:
- Open the Files app.
- Click Other Locations in the left sidebar.
- Find the Connect to Server field at the bottom.
- Enter the address in the format
dav://IP:port, for exampledav://192.168.1.100:8080. - Click Connect.
- If prompted, enter your user name and password, or connect anonymously.
- Once connected, the WebDav service will appear in the file manager as a network location.